So closely do Australians identify with Gallipoli that they often think they were the only ones there, apart from their Anzac partners from New Zealand—and the Turks, of course. Yet the campaign was a multi-national affair, with the Allied forces including soldiers from Britain, France, India, Nepal, North Africa, Newfoundland and Ireland. And while Australians in their enthusiasm to build their new nation might be forgiven for having overlooked such details, in Ireland many have forgotten the Gallipoli campaign altogether, notwithstanding the significant part that Irish soldiers played in it and its impact on
For some in Ireland it was Gallipoli rather than the Easter Rising that marked the moment when their feelings towards the British began to turn, particularly after the August offensive when the 10th (Irish) Division was almost destroyed at Suvla Bay. In her 1919 memoirs, Irish poet and novelist Katharine Tynan describes that summer of 1915 as a time
‘… when blow after blow fell day after day on one’s heart. So many of our friends had gone out in the 10th (Irish) Division to perish at Suvla. For the first time came bitterness, for we felt that their lives had been thrown away and that their heroism had gone unrecognised.’
After Gallipoli many moderate nationalists began to lose faith in the idea that supporting Britain in the war would assure Home Rule.
Irish troops were at Gallipoli from the start of the campaign. On 25 April 1915, men of the 1st Royal Dublin Fusiliers and 1st Royal Munster Fusiliers were slaughtered in their hundreds during the ill-fated landing at V Beach near Cape Helles. In May, June and July the Dublins and Munsters with their compatriots from the 1st Royal Inniskilling Fusiliers took part in the many disastrous attempts, wasteful in lives, to capture Krithia and Achi Baba, the first-day’s objectives which in the nine months of the campaign were never taken. But it was in August that Irishmen arrived at Gallipoli in large numbers as part of Allied commander Sir Ian Hamilton’s plan to break the stalemate and go on the offensive.
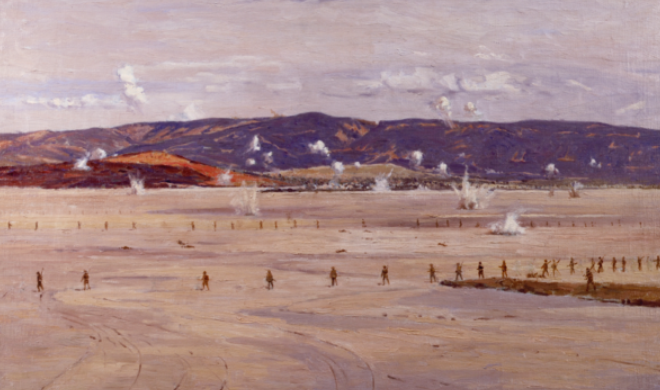
Suvla Bay
To this end the secretary of state for war, Lord Kitchener, sent Hamilton five additional divisions under the command of the elderly but inexperienced Lt. Gen. Sir Frederick Stopford. Among them was the 10th (Irish) Division under the command of Lt. Gen. Bryan Mahon. From the start the 10th Division’s experience at Gallipoli was blighted by poor planning and incompetent logistics. Its three brigades were split, with the 29th joining the Australians and New Zealanders in the Anzac sector while the 30th and 31st landed at Suvla Bay minus the division’s artillery, which was still in Egypt, and the division’s engineers, who were delayed. Nevertheless, the 10th had an early success at Suvla, when it took part in the seizure of Chocolate Hill, after having advanced across open ground under intense Turkish fire in the heat of the day and without adequate supplies of water. Apart from this success, however, the men of the 30th and 31st Brigades had little to show for their sacrifice.
Procrastination by General Stopford gave the Turks time to reinforce the heights that dominated the Suvla plain. Ground that was undefended when the Suvla landing began soon bristled with Turkish defenders. Over the following weeks the men of the 10th Division suffered heavy casualties, particularly in the assault on Kiritch Tepe ridge. Their plight was not helped when, in the middle of the battle, their divisional commander resigned in a fit of pique when passed over for promotion to commander of IX Corps following Sir Ian Hamilton’s sacking of General Stopford.
A week later, Irish regulars of the 29th Division, brought up from Helles to reinforce IX Corps, suffered badly at Scimitar Hill. During the battle, continuous shelling set the undergrowth ablaze and many wounded were burnt alive where they had fallen. Attack after attack failed to dislodge the Turks and when the action was called off more than a third of the attacking force had been killed or wounded.
Anzac sector
Meanwhile, in the Anzac sector, the 29th Brigade, which included the 6th Royal Irish Rifles, the 6th Leinster Regiment and the 5th Connaught Rangers, assisted the attempt to break out from the precarious positions along the Second Ridge, which the Anzacs had occupied since the first day of the campaign.
At Lone Pine the Australian 1st Division commenced its assault on the afternoon of 6 August. It was to be one of the bloodiest fights of the whole campaign, resulting in more than 2,000 Australian and 5,000 Turkish casualties in four days of hand-to-hand fighting with bayonet and bomb in the labyrinth of Turkish trenches and tunnels. Seven Australians were awarded the Victoria Cross. It was at Lone Pine that the Connaught Rangers first saw action, supporting the Australians and helping to clear the Turkish trenches clogged with the dead, dragging the bodies to Brown’s Dip for burial.
Meanwhile, two companies of the 6th Leinster Regiment relieved the Australians holding Courtney’s Post and Quinn’s Post, both vital positions on the Second Ridge, where throughout the night the Turks kept up a stream of rifle and machine-gun fire. General Godley later wrote to the commander of the 29th Brigade that ‘the work of the Leinster Regiment at Quinn’s Post & Russell’s Top has been excellent throughout’.
But these were only diversions whose purpose was to draw Turkish reserves to the south of the Anzac position while the Anzacs stealthily climbed the rugged spurs leading to Chunuk Bair and Hill 971, the high points of the Sari Bair range. While the Australians became hopelessly lost in their attempt to climb Hill 971, the New Zealanders were successful in reaching the crest of Chunuk Bair in the early hours of 8 August. Turkish artillery wiped out the main Kiwi force on the summit, however, leaving the support companies holding a trench just below it. For a day and a half they held on before being relieved by two English battalions.
In order to consolidate his hold on Chunuk Bair, the Anzac commander, Lt. Gen. William Birdwood, ordered his reserves, including the 6th Royal Irish Rifles, to reinforce the position. After a night of scrambling over rough country, they arrived at a small plateau beneath Chunuk Bair called ‘the Farm’, where British and New Zealand troops occupied trenches around its outer edge. In the Australian official history, Charles Bean described what happened next:
‘As they lay there, an order came to a company commander of the [Royal Irish] Rifles to advance over the terrace. “Surely you won’t do it—it can’t be done,” said an officer of the Maoris who lay next him. “I’m going—I’ve been told to,” was the reply. He led forward the men round him, and, according to the testimony of the Maori officer, none came back.’
Bean recorded in a footnote to his account that bodies of men of the Royal Irish Rifles were found after the war within 20m of the crest of Chunuk Bair.
The 6th Leinster Regiment was also committed to the fight, arriving on the night of 9 August at the Apex, a knoll on Rhododendron Ridge a few hundred metres from the summit. But by then the Turks were assembling on the far side of Chunuk Bair in readiness for a counterattack that was unleashed the next morning. Waves of Turkish infantry swept over the summit, killing most of the defenders on the crest and driving the remainder back down the western side. The remaining 6th Royal Irish Rifles, fighting desperately to hold the Farm, lost almost all their officers before withdrawing from the position.
Rhododendron Ridge, the advance position at the Pinnacle, occupied by the Loyal North Lancashires, was overwhelmed and the way was open for the Turks to push the enemy off the ridge. In front of them was the Apex, held by remnants of the Wellington Battalion, the Leinsters and the massed machine-guns of the New Zealand Infantry Brigade. Major Bryan Cooper, an officer with the 10th (Irish) Division, later wrote:
‘On the right the Leinsters stood their ground. At last the moment had arrived to which they had so anxiously looked forward. Turk and Irishman, face-to-face, and hand-to-hand, could try which was the better man … In spite of the odds, the two companies in the front line succeeded in checking the attack, and at the crucial moment they were reinforced … from the support line … Shouting, they flung themselves into the fray, and drove the Turks back after a desperate struggle at close quarters.’
Holding the Apex was vital, as the New Zealand machine-gunners were able to pour a withering fire into the Turks, stopping their further advance. After the battle Major-General Godley sent for the commanding officer of the Leinsters and complimented him on the work of the battalion that morning.
 Hill 60
The Connaught Rangers, brought up to support the New Zealanders, reoccupied the Farm. But with the Turks in command of the high ground, the position was untenable and they were ordered to withdraw. Thus ended the battle of Chunuk Bair, the last best hope of an Allied victory at Gallipoli.
The fighting continued for another three weeks as the British at Suvla attempted to link up with the Australians and New Zealanders at Anzac. The key to success lay in taking Hill 60. When the attack began on 21 August, the Connaught Rangers on the left of the attacking force had the task of seizing the Kabak Kuyu wells, which could provide much-needed water for the parched troops fighting in the heat of the Gallipoli summer.
After capturing the well, the Rangers charged Hill 60 in support of the New Zealanders. In their wild charge the Rangers lost twelve officers and 248 men, of whom 46 were killed before they were eventually stopped. The Australian official historian Charles Bean described the charge:
‘[The Rangers] were seen dashing up the seaward end of the hill, the Turks running before them. This fine charge called forth the admiration of all who beheld it, and such a movement, if it had been concerted and delivered along the whole line of attack with the flanks well guarded, would probably have carried Hill 60.’
By nightfall the Allies had secured but a foothold on Hill 60, with only the New Zealanders in possession of a small section of Turkish trench. Further attempts that night failed to dislodge the Turks. General Birdwood ordered another assault for 27 August. The New Zealanders and Connaught Rangers managed to gain access to another section of Turkish trench. From there, as night fell, the battle became one of hand-to-hand fighting in the maze of trenches that criss-crossed the hill, with Anzacs and Irishmen fighting literally shoulder to shoulder against the Turks.
The Allies never did capture the summit of Hill 60. But they continued to hold the seaward slopes, securing the Anzac flank and keeping open the link with Suvla. Like so much of what happened at Gallipoli from 25 April onwards, the action at Hill 60 was a half-victory gained at great expense in lives.
Reduced to under-effective strength, the units of the 29th Brigade were employed mostly in work parties until 29 September, when they marched down to the shore and, with their compatriots of the 30th and 31st Brigades from Suvla, boarded ships for Lemnos.
10th Division ‘shattered’
Major Bryan Cooper summed up the campaign from the Irish perspective:
‘The 10th Division had been shattered, the work of a year had been destroyed in a week, and nothing material had been gained.’
Nevertheless, among Anzacs and Irishmen a mutual respect emerged following their shared experience. In November 1915 a party of wounded Australian soldiers evacuated to England met John Redmond while visiting the House of Commons and expressed to him their admiration for the fighting qualities of the Irish soldiers. The charge by the Connaught Rangers was, they said, the finest thing they had seen.
One hundred years on, Gallipoli maintains its hold on Australians as the founding myth of their young nation. To the Irish, however, it has a largely hollow ring, for, despite the contemporary prediction of Irish journalist Michael MacDonagh that Gallipoli would ‘ever be to the Irish race a place of glorious pride and sorrow’, the crucible of the Irish nation was to be elsewhere and at another time. Its founding myth holds no place for Irishmen who fought in what many regarded as ‘England’s war’. Even so, Gallipoli is a tragedy worth remembering—in Ireland as well as Australia.
Jeff Kildea is an adjunct professor in Irish Studies at the University of New South Wales.
Further reading
B. Cooper, The Tenth (Irish) Division in Gallipoli (Dublin, 1993).
J. Kildea, Anzacs and Ireland (Cork, 2007).
P. Orr, Field of bones: an Irish division at Gallipoli (Dublin, 2006).
S. Sandford, Neither unionist nor nationalist (Dublin, 2014).